All information contained in this FAQ is provided by BMW enthusiasts who are not typically fully trained in the art of BMW maintenance. As such, all information in this FAQ is provided "as-is". Any use of this information is strictly the responsibility of the using party. The supplier of the information and the Webmeister assume no liability for incorrect information or use of this information.
While the following article augments the instructions that come with a short shift kit, the tips can also be useful if you have to change the coupling (#10) due to a sloppy shift lever.
Also, while this page is part of the Big_Coupe_Group FAQ, I believe it applies to most if not all models in this era. I have found that E28's and E30's are virtually identical.
By Norm Grills
Having just installed a Metric Mechanic short shift (in effect twice) I would like to share some tips that will make the installation easier for the next person.
Drop the exhaust system and drive shaft. It makes the job a lot easier.
Supporting the transmission, loosen the transmission support bracket and lower the transmission a inch or two. It will make access to the shift mechanism a lot easier.
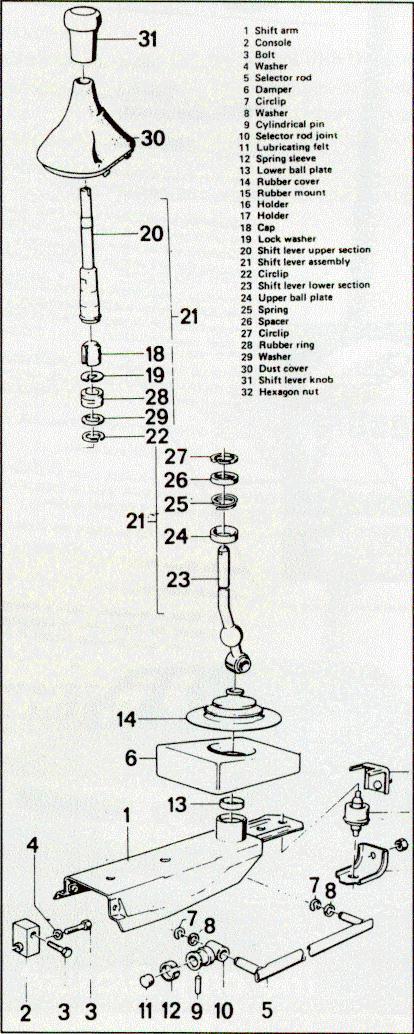
To remove the spring sleeve (#12), use two standard screwdrivers, one with a fairly large blade and the other fairly small. Both should have long shanks. Use the large blade with a twisting action to spread the sleeve. With the smaller blade push towards the front of the car on one end of the sleeve to get the sleeve started out of the groove. Then proceed to push the rest of the sleeve forward until it is all the way off.
The cylindrical pin (#9) will only go up to remove and down to install.
Once you have the upper end of the shift assembly dismantled (shifter knob off, boot removed and felt taken out) remove the wires and connector from the rubber boot if present. It will slip through the small hole in the rubber boot.
If you have the steel shift arm (# 1), remove it complete with the shift lever from the car and take it to the workbench for dis-assembly and re-assembly. I do not have the aluminum version so I don't know the best way to handle it. The steel version is the one pictured.
Check the transmission selector rod seal and if wet or misting, replace it at this time. Also, if the transmission output shaft seal is leaking, replace it. A secret for the selector seal is to grind down an old, long, thin screwdriver and put a notch in it that will accommodate the seal. Push it in between the rod and the seal. Turn it 90 degrees so that it engages the seal. Grab the screwdriver with vice grips and using the transmission output flange as a pivot point give the vice grips a quick pop. The seal should pop right out. Mine did. You might have to work it a couple of times at points on the seal 180 degrees apart to get it to pop out but it will. PERSEVERE!
When you are ready to dismantle the two halves of the shift lever, notice the position of the two notches in the shift lever upper section (#20). Make sure when you re-assemble the upper and lower sections that the notches are in the same relative position to the lower section when it is installed in the shift arm (#I).
Do NOT assemble the selector rod (#5) to the shift lever lower section (#23) until you install the rod onto the transmission shifter rod. HOWEVER, do install the spring sleeve (#12) over the selector rod joint (#10) and put it on the wider raised shoulder of the joint(#10).
Then assemble the selector rod (#5) to the transmission selector rod inserting the pin from the top down. Then slide the spring sleeve (#12) forward into the groove of the selector rod joint (#5) until it is fully seated in the groove.
Only after the selector rod is installed should you re-install the shift arm (#I), making sure you re-lube any rubbed off lubrication on the shifter ball or the selector rod bushing where it connects to the shifter lever.
Once you have completed the above, jack the transmission back up, re-connect the transmission support bracket the drive shaft and the exhaust system. Make sure you replace the flex disk nuts as these are one-time usage nuts. You might also want to install new exhaust pipe to manifold nuts. These are cheap compared to the aggravation of having rounded nuts.